Designed by Cathy Campbell via Knitting on the Net
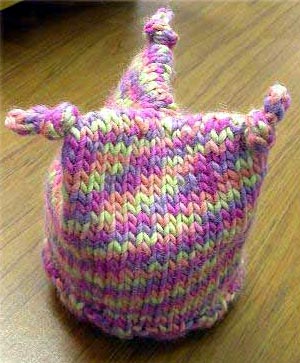
This adorable baby hat knitting pattern knits up quickly on big needles. It fits newborns and is 16" in circumference. To make a larger hat, add 1 or more stitches to each third of the hat.
Gauge:
12 sts=4 inches in St st
Materials:
Iceland by Crystal Palace Yarns
1 skein Color #7243 Picnic
100% Australian Merino Wool
109 yards/100 grams
Size 10½ US (6.5 mm) 16" circular needles and/or double points
Tapestry needle
Instructions: CO 48 sts on either circular or double pointed needles and join.
Work k2 p2 rib for 1½".
Change to St st and work even until piece measures 6½".
Divide the first 16 sts between two double pointed needles, leaving the rest on either the circular or the other double pointed needles.
Work Kitchener Stitch over those 16 st until 3 sts remain.
Work I-cord over these 3 sts for 4". Cut yarn, thread through tapestry needle, thread through sts, take off needle and pull to close.
Repeat two more times. Weave in ends on WS. Tie each I-cord into a knot.
Kitchener Stitch:
Break a good length of yarn off and thread a yarn needle. With RS facing and holding one double-pointed needle at the front and one at the back, insert yarn needle into first st on front needle PURLWISE. Then insert yarn needle into first st on back needle KNITWISE. *Next, insert yarn needle KNITWISE into first st on front needle, pull it off the needle, and insert yarn needle into second st on front needle PURLWISE. Next, insert yarn needle PURLWISE into first st on back needle, pull the st off the needle, and insert yarn needle into the second st on back needle KNITWISE. Repeat from * until three sts remain.
©Crystal Palace Yarns and used with their permission.
| alt alternate approx approximately beg begin or beginning BO bind off CC contrasting color CO cast on, cast off cm centimeter cn cable needle cont continue dec decrease dpn double pointed needles eor every other row est established inc increase k or K knit k1, s1, psso knit one, slip one, pass slipped stitch over k2tog knit 2 together k2tog tbl knit 2 together through back loop MC main color M1 make one mm millimeter p or P purl p2tog purl 2 together p2tog tbl purl 2 together through back loop pat pattern pm place marker psso pass slip stitch over rem remaining | rep repeat Rev St st reverse stockinette stitch RS right side rnd round sm slip marker SSK slip 1, slip 1, knit two together sl slip sl 1, k1, psso or SKP slip 1, knit 1, pass slipped st over st(s) stitch(es) St st stockinette stitch, stocking stitch tbl through back loop(s) tog together WS wrong side wyib with yarn in back wyif with yarn in front yfon yarn forward over needle yfrn yarn forward and round needle yo yarn over yon yarn over needle yrn yarn round needle * repeat instructions following or between asterisk as indicated [ ] repeat instructions inside brackets as indicated |
Glossary Of Knitting Terms Knitting patterns commonly use these knitting terms.
- Bind Off In Pattern
- This is a small detail but adds a professional touch. You will generally see this instruction when you have been knitting using a stitch pattern instead of stockinette. Work the next row of the stitch pattern, knitting and purling just as if you were working that row, as you bind off.
- Decrease Or Increase Evenly
- Sometimes a pattern will tell you specifically where to decrease or increase across a row; other times it will only tell you the specific number of stitches to decrease or increase and to do so evenly. You don't want the decreases or increases together at one end but spread out as evenly as possible across the entire row. Otherwise, it will cause your knitting to pucker and flare. For help on how to determine how to spread out your decreases or increases evenly, please see Increasing Evenly. You will find the principle is the same to decrease evenly.
- Keeping To Pattern
- If you knitting a stitch pattern, you'll just follow the instruction for each row as long as you keep working over the same number of stitches. But as you shape a project, such as a sleeve or a neckline, you will find that you need to increase or decrease the number of stitches you are knitting. This changes where you will begin and end each row. Please see Keeping To Pattern for help.
- Multiple Of Stitches
- A stitch multiple is the number of stitches you need to have for one complete repeat of a stitch pattern. A multiple of 5 stitches means you should cast on any number of stitches that is divisible by 5. A multiple of 6 + 1 means you should cast on any number of stitches that is divisible by 6 plus 1 extra stitch.
- Reverse Shaping
- Almost all cardigan patterns will give you exact instructions for knitting one front; the other front instruction will tell you to knit it the same way, but reverse shaping. The neck and armhole edges are at their logical respective places. With the right side facing the public, hold the left or right front up against you. This is the easiest way to tell which is the armhole edge and which is the neck edge if you get confused. To reverse shaping, work the shaping at the opposite end from where you worked it for the first side. Usually you will begin to shape an armhole by binding off stitches. If you bound off the stitches at the beginning of a right side row for one front, you would bind off stitches at the beginning of a wrong side row for the other front. This keep the shaping on the correct edge. If you are increasing or decreasing at the beginning of a row for one front, you would increase or decrease at the end of the row for the other front.
- Selvedge
- You will also see this word spelled selvage. All knitting has a selvedge on each side. It only means the first and last stitches. If it's something that will be seamed, these are the stitches that will be used to seam the piece together; they will no longer be visible when it is sewn. With knitting projects such as scarves and afghans where there are no seams, you will have a selvedge. You will sometimes see a pattern that tells you to work the first and last stitch in a specific way, such as slipping the first stitch and knitting the last stitch. This creates a neat selvedge on each side that enhances the look of the project.
- With Right Side Facing
- You will often see this term when you are about to pick up stitches along an edge but you may see it at other times as well. The right side, or the side that will be facing the public when it's completed, should be facing you as you work.
- Work Even
- This term often follows a sequence where you just completed shaping and have increased or decreased. You will have a different number of stitches than when you began that sequence. You are now working over the number of stitches you currently have.
No comments:
Post a Comment