by A Load of Craft
Pattern & Tutorial - Here's a much cheaper alternative to buying a slipcover for your boppy.You will need
Pages 2-7 of the pattern printed twice
24" zipper
Sewing machine
Flexible measuring tape
About a yard of farbic or 1/2 yard each of 2 different fabrics (print pattern first and measure to get exact amount)
I made mine before I was doing my craft blog so I didn't take pictures of the process. Luckily my friend made one and she let me take pictures of hers while I was helping her with the zipper part.
Tape the pattern together so the grey areas are hidden. This is what you'll use to cut your fabric out on the fold. Ignore the stitch line because it's not accurate.
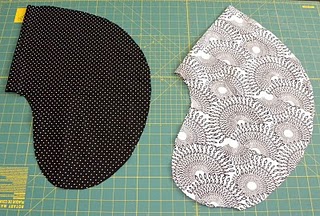
Here are her two pieces of fabric already cut out (note: they're both still folded in this picture)
Unfold each and pin the "front" of the boppy cover (see picture below) with right sides together and measure and mark 12" out from the center in each direction. This is your zipper's length. Now mark 2" out from those marks on each side. Using a 1/2" seam allowance (note: the original pattern says to use 1/4" but I liked it tighter-fitting), sew a regular stitch starting at your outtermost mark and then switch to a basting stitch at the zipper's mark. Baste to the opposite side's zipper mark then regular stitch those last two inches. Sounds harder than it is. Refer to my throw pillow cover tute for the same instructions worded a bit differently 
Once your basting stitch is done, iron the seam open.
Then pin your zipper, with the teeth directly on the seam, to the seam allowance only (not to the cover) and sew as close to the zipper teeth as you can using your zipper foot. You will stitch a straight line on each side of the zipper.
Once that is done you can do what I did on my throw pillow cover tutorial and just fold the seam closed with the zipper sandwiched inside it and sew a line on each end of the zipper from the raw edge to the basting stitch. This way you don't see any stitching around the zipper when you turn it right side out.
Now get out your seam ripper and rip the basting stitch from the right side.
This is what it will look like if you use an invisible zipper, otherwise you see the teeth which is fine too.
After this step I gave it back to her to finish so I don't have any more pictures but from here you just turn it so right sides are together again and sew around the rest of it with a 1/2" seam allowance and you're done!
No comments:
Post a Comment